


AAAwave
NVMe Base M.2 HAT PCIe Extension w/ 1 TB M.2 2280 Internal Solid State Drive SSD


Add super-fast storage to your Raspberry Pi 5 allowing for lightning fast boots, NAS use, and snappy applications!
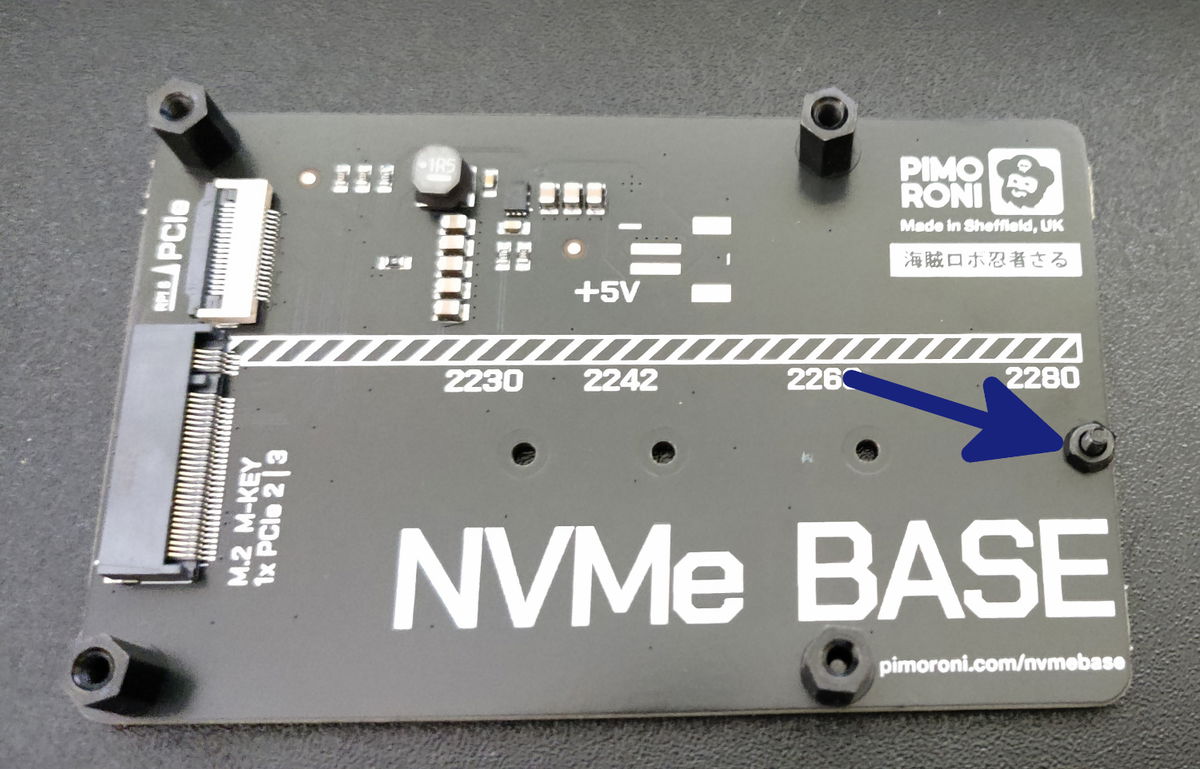
NVMe Base is a PCIe extension board for Raspberry Pi 5. Simply populate it with an M-key NVMe SSD (2230 to 2280 sizes supported) and mount it under your Pi for a compact and fast storage solution - It even comes with rubber feet!
It's the perfect solution for turning your Raspberry Pi 5 into a file server, media centre, reverse proxy, etc. - really any task that benefits from large amounts of fast storage, especially with random high operations per second (IOPS) workloads. In short it's a game changer!
NVMe base follows the new "PIP" provided by Raspberry Pi ensuring that it will be easy to use and be supported long term by updates to Raspberry Pi OS - though it is very early days and things are improving rapidly there!
Raspberry Pi Firmware
For the most hassle-free experience, make sure your Raspberry Pi OS is up to date, and your RPi 5 firmware is updated to 2023-12-06 (Dec 6th) or newer. This supports all the features of the RPi PCIe spec and means you don't have to mess with config files to get started.
Base Kit
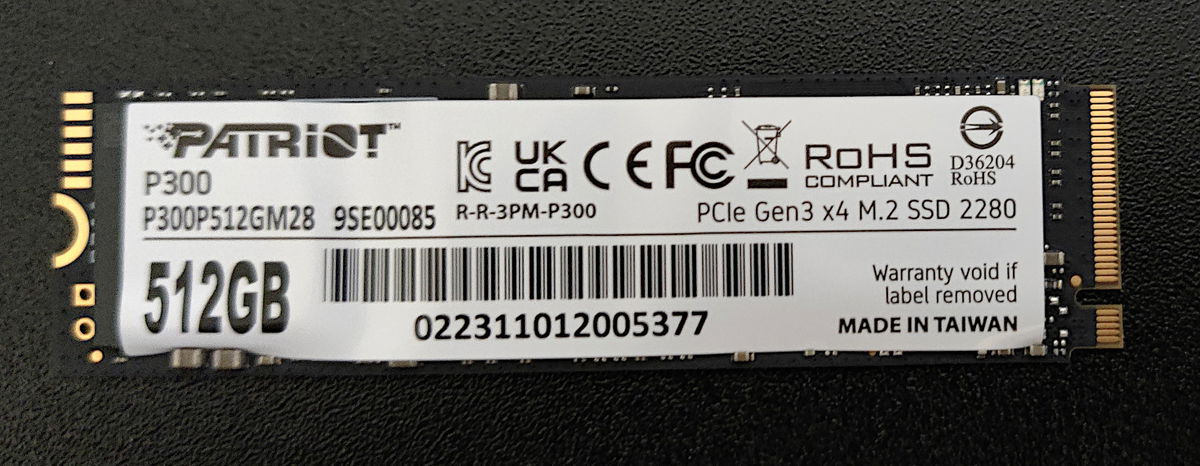
- SSD: MP33 1 TB M.2 2280 (5-Year Warranty)
- NVMe Base PCB with M.2 Slot (M-Key)
- 'PCIe Pipe' Flat Flex Cable
- 4x Rubber feet
- M2 bolt and 2x nuts for SSD mounting
- 4x 7mm M2.5 standoffs for base mounting
- 8x short M2.5 bolts for base mounting
- 4x long M2.5 bolts for 'pass-thru' mounting with a HAT
Notes
- Always power off your RPi and disconnect the power supply before installing or uninstalling the NVMe Base.
- NVMe Base offers a general purpose PCIe x1 connection - while we know most people want to add fast storage in theory you can use other devices with it, we just can't help you make them work!
PUTTING IT TOGETHER
Start by posting one of the short screws through the larger holes in the Base from the bottom (the side without components) and screw on the standoffs.
Repeat with three of the other short bolts and standoffs.
A little later you will be placing your Raspberry Pi 5 on the standoffs and use the remaining four short bolts to secure it in place.

SECURING THE SSD
Take the thin (2mm) bolt and post it through the board from the bottom in one of the small holes running down the middle of the board. Use the hole which corresponds to the length of your SSD (2280 in the case of the SSD supplied by Pimoroni). Secure it in place with one of the nuts.
Unpack your SSD, being careful to avoid touching any of the gold connectors on the end.
You will notice a notch breaking up the connectors on one end of the SSD. This corresponds to the M.2 socket on the Base board.
There is a round semi circular cutout in the middle of the other end. This is where that thin bolt will be used to secure the SSD to the Base.
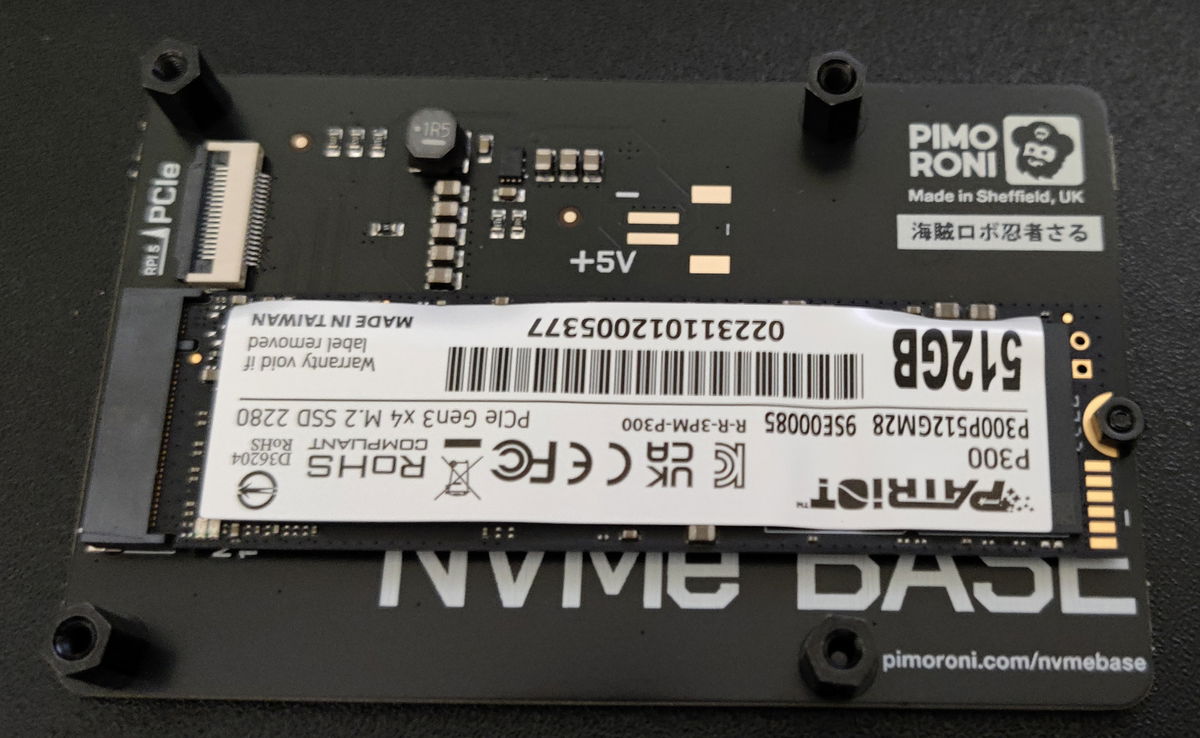
Now carefully push the SSD into the socket. It will only go in one direction, and doesn't need much effort.

Gently push the SSD down at the other end and secure it in place by putting the second nut on the screw you fixed in place earlier.
CONNECTING THE RIBBON CABLE
NOTE: You may want to use a pair of tweezers for this part.
It is now time to secure the ribbon cable, firstly onto the Base board, and then onto the Raspberry Pi PCIe socket. This can be fiddly, however following these simple steps should ensure success.
The two ribbon cable sockets hold the ribbon in place using small plastic clips which you have to 'open' to put the ribbon in, and close again to secure it in place. These clips are quite fragile, and require very little pressure to move. The clips on sockets of the Base board and the Raspberry Pi work slightly differently from each other, so be careful to read these instructions before proceeding.
Let's first take a look at the ribbon cable. One end is wider than the other. This is the end which goes into the NVMe Base connector, and is labelled on the ribbon as 'ADDON'. The other end, labelled 'RPI 5' will go into the Raspberry Pi 5's PCIe connector.
When in place, the writing and Pirate logo will face outwards.

SECURING THE RIBBON TO THE BASE BOARD
Using tweezers or a fingernail, flip the grey clip of the socket on the NVMe Base upwards. It will swivel into an upright position.
Now gently push the ADDON end of the ribbon cable into the socket, ensuring the side with the writing is pointing downwards. You should see the cable go under the silver 'connectors'; these are in fact what provides the pressure to hold the ribbon down onto the real connectors.
Gently rotate the clip back down into its original position. You should be able to see about 1mm of the brown surface of the ribbon protruding from the socket.

INSTALLING YOUR OS ONTO THE NVME SSD
There are a few ways you can install your chosen OS onto the NVMe SSD and experience the speed boost, depending on whether you want to install from scratch or if you already have your OS installed and set up how you want.
For all options you need to start from the latest Raspberry Pi OS (Bookworm or later). If you don't already have a microSD card with the OS written to it, create one now using the Raspberry Pi Imager software (it's available for Windows, macOS and Linux), or using your usual method.
Alternatively, you can use an existing card, as long as it has the latest OS (Bookworm or later) on it.
Before doing anything else, boot your Pi from the SD card and ensure the OS is up to date (otherwise it may not have the required updates for the NVMe to be properly recognised).
Open a terminal (Ctrl-Alt-T, or find it in the Pi OS menus) and type:
sudo apt update && sudo apt upgrade -y
The Raspberry Pi 5 uses an EEPROM to store some boot settings. This needs to be updated to a version dated newer than December 2023. The command above should have done that for you, but to double check, type the following into a terminal to check:
sudo rpi-eeprom-update
If it is not post-December 2023 type the following into a terminal to start the configuration tool:
sudo raspi-config
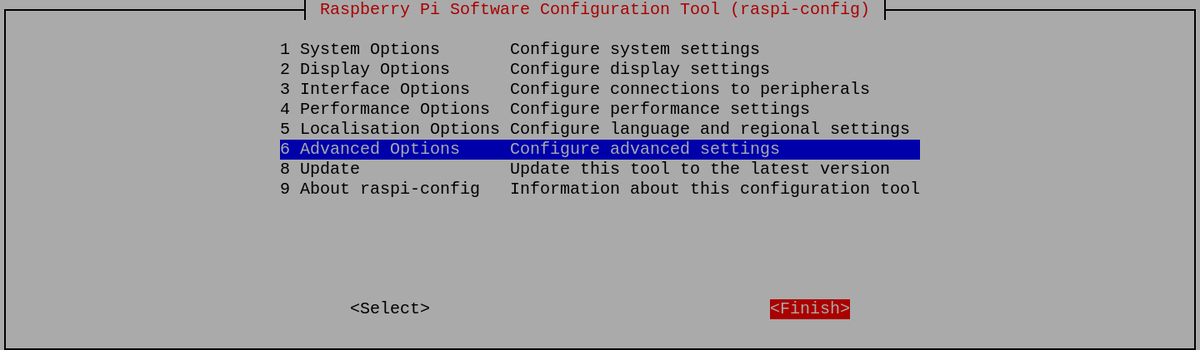
Scroll down to 'Advanced Options' and press Enter:

Scroll down to 'Bootloader Version' and press Enter:

And finally choose 'Latest', and press Enter:
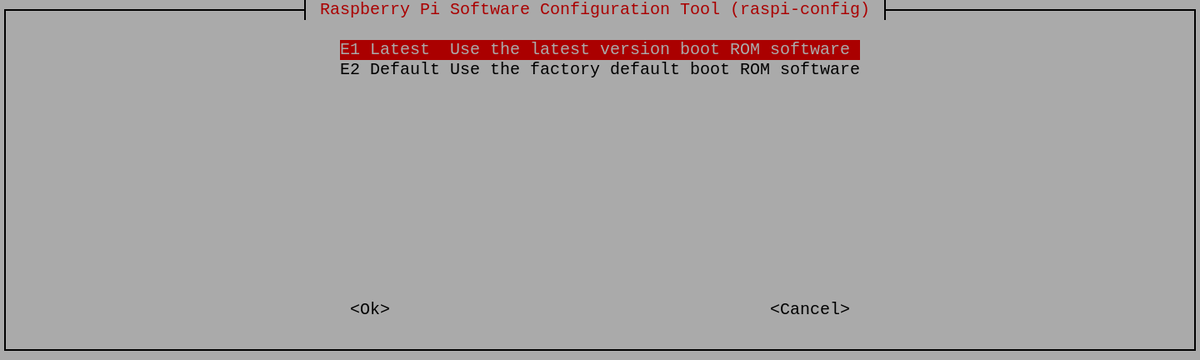
Select 'No' here - you want the 'latest' bootloader.

And exit from the tool by selecting 'Finish':
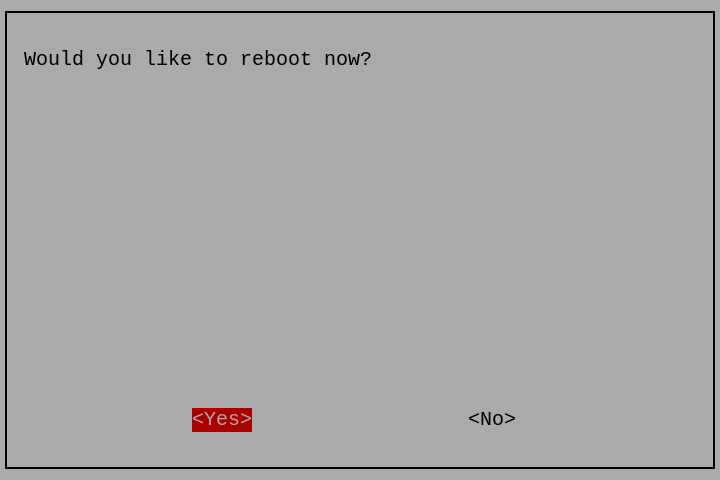
If asked to reboot, select 'Yes'.
CHECKING NVME BASE INSTALLATION
Before installing an OS, you should first check that the ribbon cable has been connected correctly and the SSD installed properly.
Boot your Raspberry Pi from a microSD card.
Open a Terminal window and type:
ls /dev/nvme0
If the file exists (i.e. /dev/nvme0 is repeated back in the terminal) then all is good and you are ready to proceed.
If that file cannot be found, the terminal will report:
ls: cannot access \'/dev/nvme0\': No such file or directory
In which case, turn off your Raspberry Pi and recheck the ribbon cable connections and the SSD installation. Remember that the clips on both the NVMe Base and Raspberry Pi 5 need to be folded/pressed back in place for the connections to work.
Handling time: All orders are shipped as soon as possible within 2 business day after payment confirmed. However, we cannot control transit time once your package is handed over to the courier. We process and ship orders Monday – Friday and are unable to offer weekend or holiday delivery.
Shipment Methods All shipping requires additional 1-2 days of processing timeFree budget shipping (8-14 business days)
USPS Priority (3-7 business days)
Free 2-Day Shipping on Select Items – Includes Hard Drives, HPE Networking, and Yealink! (Choose free shipping at checkout)
Returns PolicyAll products sold by aaawave.com are brand new and carry the manufacturer’s full warranty. All products advertised as BULK or OEM are brand new and carry the manufacturer’s full warranty.
*Note: "BULK" and "OEM" items do not come in a retail type of packaging, do not include hardware, accessories, cables,software, or literature. Unless otherwise noted.
All products are shipped to the customer the exact same way that we receive them from the manufacturer. We are NOT responsible for physical damage or misuse of the product, damage or misuse of the product will automatically void the manufacturer warranty.
* Note: AAAwave.com does not accept returns for refunds or exchanges of the following items: Product listings that state "Limited Supply, All sales are final". Opened software and software product keycards. The sales of all the items aforementioned are considered final.
Schedule and Time
AAAwave offers a 30 day return/exchange policy, unless otherwise noted. The return/exchange policy begins on the
customers purchase date. No returns or exchanges will be accepted after 30 days. All refunds will be made back to
the customer’s original form of payment within 7 business days of receiving the return merchandise. Return
Merchandise Authorization number (RMA) are valid for only 10 business days. Packages must be received by us within
10 business days after the RMA number has been issued. Packages received after 10 business days will not be accepted
and the warranty period will be considered voided and cancelled. RMA processing time is 5-7 business days once the
package has been received.
Extra Charge
AAAwave reserves the right to refuse the return or to charge a minimum 10% restocking fee.
There is no restocking fee if the product is returned factory sealed and unopened (including an intact UPC code) and must include all packing material, blank warranty cards, manuals, and accessories. AAAwave can only refund the original purchase price.
We offer RMA replacement without any restocking fee to customers who have received a defective product.
Shipping costs is non-refundable.
Product exchanges can be accepted for defective items, the same exact item only.
Customer’s Duty
aaawave.com does NOT offer "Advanced Replacement" for the exchange of defective merchandise.
aaawave.com does NOT pay the return shipping costs for defective merchandise.
We are NOT responsible for product defects, because we do not manufacture the products we sell. aaawave.com will pay
for shipping "Back to the customer" for exchange of defective items.
All returns and exchanges must be accompanied with a Return Merchandise Authorization number (RMA number). Please
contact us for a RMA number prior to sending your package. aaawave.com will NOT accept packages without prior
authorization and a RMA number.
All packages being shipped to aaawave.com must have a valid tracking number that is with a major courier such as
UPS, FEDEX, or USPS.
What shipping options are available?
We offer standard and expedited shipping options within the U.S. Shipping rates and estimated delivery times are displayed at checkout. Shipments to Alaska, Hawaii, and other U.S. territories (i.e. Guam, Puerto Rico, Virgin Islands etc.) require expedited shipping and incur shipping charges. Items may be delivered separately in multiple shipments.
Is my payment information secure?
Yes, we partner with world leaders in technology and security to provide you with an easy-to-use, fully interactive, and secure online shopping experience. Your transaction is secure, and we work hard to protect your security and privacy.
Do you ship internationally?
Currently, we only ship within the U.S. For international inquiries, please contact our support team.
What if a product is defective?
All new products carry the manufacturer's full warranty. If you receive a defective product, please contact us for a Return Merchandise Authorization (RMA) number. We offer RMA replacement for defective items (the same exact item only). Please note that we do not offer "Advanced Replacement" and do not cover return shipping costs for defective merchandise.
30 Day Return Policy.
AAAwave.com offers a 30 day return/exchange policy, unless otherwise noted. The return/exchange policy begins on the customers purchase date. All refunds will be made back to the customer’s original form of payment within 7 business days of receiving the return merchandise.
Are you an authorized reseller for the products you sell?
Yes, we are an authorized reseller for many brands, including Arduino, ASUSTOR, Avermedia, Dynatron, HPE networking, Gigabyte, MSI, Intel, XFX and Streacom.
How can I track my order?
Once your order ships, you will receive a tracking number via email. You can also track your order by logging into your AAAwave.com account and ask our chatbot.
Do your products come with a warranty?
Yes, most of our products are covered by the manufacturer’s warranty. Warranty details can be found on the product page or by contacting our support team.
What are your business hours?
Monday – Friday (Excluding Holidays) 8:00am – 6:00pm PSTRelated Products


Pimoroni
Pimoroni NVMe Base M.2 HAT PCIe Extension w/ 500 GB M.2 2280 Internal Solid State Drive SSD
Add super-fast storage to your Raspberry Pi 5 allowing for lightning fast boots, NAS use, and snappy applications! NVMe Base is a PCIe extension board for Raspberry Pi 5. Simply populate it with an...
 of 512 GB M.2 2280 Internal Solid State Drive SSD")

Pimoroni
Pimoroni NVMe Base Duo M.2 HAT PCIe Extension w/ (2-Pack) of 512 GB M.2 2280 Internal Solid State Drive SSD
NVMe Base Duo M.2 HAT PCIe Extension with (2-Pack) 500GB M.2 2280 Internal SSD NVMe Base Duo is a PCIe Gen 2 extension board for Raspberry Pi 5. Simply populate it with one or two M-key NVMe...


